Showing posts with label starbursts. Show all posts

Sunday, September 23, 2012

A First: Sunburst/Starburst Tips and Tricks

So one of my goals I set on New Year's Day was to share some of what I have learned on my blog. If you follow along you know that I am a teacher by trade. Despite this fact, I have felt super hesitant to do any sort of "teaching" on the blog as I find myself feeling unqualified to do so. However, I have been so grateful for all of the people who have put themselves out there to share what they have learned because it has helped me in my photography journey. It only seems right to give back a little and hopefully help someone move forward a step or two on their own journey. So, without further ado here are a few tips and tricks I have learned about shooting sunbursts and starbursts (along with some of my favorite sunburst shots)...

Tips/Tricks (see below for more details)
1. Shoot in RAW
2. Choose a larger aperture number
3. Meter off the sky
4. Take your shot and then change your perspective and repeat!

Settings: ISO 200, 29mm, ss1/160, f/25
Quincy Wildlife Recreation Area, Quincy, WA - June 2012

1. Shoot in RAW - I do this for all of my photos, but with sunbursts especially it makes processing easier.

Settings: ISO 200, 18mm, ss1/500, f/18 
Washington State Ferry - December 2011

Settings: ISO 200, 18mm, ss1/100, f/22
Birch Bay, WA - April 2012


2. Choose a large number aperture - My go to for getting the best sunburst shape is f/22, but I have gone as low as f/11 or f/16 in certain situations. And one time even as low as f/5.6, but I think that had more to do with the angle of the sun and camera than the aperture. I have also gone higher such as f/25. Usually the higher the number the more defined the sunburst. In some cases this means using a tripod because the aperture is letting in so little light that your shutter needs to be open longer to expose properly.

As I read on a site when I was first researching how to shoot sunbursts, this is similar to when you squint your eyes thereby letting in less light (just as higher aperture numbers do) and the points of light become starburst shapes. And yes I did try this as I was reading and yes it did help me understand shooting starbursts (just in case you find yourself squinting at a light as you read this :o).

Settings: ISO 200, 18mm, ss1/320, f/22 
Clark Lake Park, Kent, WA - March 2012


Settings: ISO 100, 50mm, ss1/640, f/20 
Puyallup Fair, Puyallup, WA - September 2012


3. Meter off the sky - I use spot metering and when I shoot sunbursts I expose (or meter off of) the sky. This can be a little tricky as you are shooting directly into the sun, which can make seeing your light meter difficult. Two things I do about this: 1. Wear sunglasses. Even though this distorts the image color a bit, it helps your eyes not get blinded by the bright sun. And 2. Hold the camera still (or use a tripod) and press down the shutter button halfway so the light meter shows up on your LCD screen and adjust your shutter speed while continuing to hold the camera still.

In many cases when you meter off the sky with the sunlight in the picture it can create an image that is a bit underexposed, but that can be adjusted in post processing.

Settings: ISO 200, 24mm, ss1/320, f/25 
Long Beach, WA - February 2012


4. Take your shot and then change your perspective and repeat! Some of my favorite sunburst shots have come from laying on the ground or standing up when I have started in a different position.

Settings: ISO 400, 55mm, ss1/320, f/5.6
Point Defiance Park Dahlia Test Garden in Tacoma, WA - August 2012


You can also use some of these tricks (shoot in RAW and high aperture number) to capture starbursts (the same as sunbursts, but with lights and not the sun)!

Settings: ISO 400, 50mm, ss13.0sec, f/22
Lewis and Clark Bridge connecting Oregon and Washington
with the Lights of Longview, WA - January 2012

"In learning you will teach, and in teaching you will learn.” - Phil Collins

As a side note, if some or most of this sounds like a foreign language to you (which has been the case for me many times over the course of my photography learning) this post does assume that you are shooting on manual. If you aren't I highly recommend you check out Courtney at Click It Up a Notch's posting on shooting manual mode. It is what got me started and I am so happy I have made the switch to manual! 

And of course, if you have any questions please feel free to ask in the comments or through email. 

(I would love to know what you thought of my first tips and tricks post! Feedback is always welcome! :o).

Thursday, April 19, 2012

Texture Illuminated 4.13.12

On the last day of my Spring Break, Friday, we drove up to northern Washington to the Semiahmoo Park and then to Birch Bay. We were almost to Canada and I had never been that far north before. Both parks were beautiful and unique. It was an amazing new experience and a great place to recharge. 

Location: Semiahmoo Park
Settings: ISO 200, 250mm, ss1/400, f/22 (sunlight wb)
Intent: The sparkling of the sun and the texture of the clouds
LR Processing: Clean edit with basic settings and tone curve to add definition

Location: Birch Bay Park
Settings: ISO 200, 18mm, ss1/100, f/22 (sunlight wb)
Intent: The texture of the rocks and the lines of the water and beach
LR Processing: Clean edit with basic settings and tone curve to add vibrancy

"The moment one gives close attention to any thing, even a blade of grass it becomes a mysterious, awesome, indescribably magnificent world in itself." - Henry Miller

  project64 button

Monday, December 5, 2011

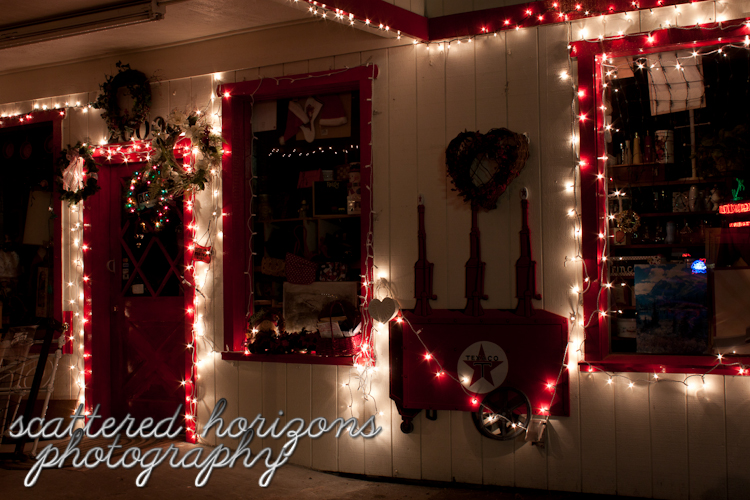
Good to Wow SOOC: The Holidays Begin in Anacortes 12.04.11

As I mentioned yesterday, I had a great day of shooting on Orcas Island! To get there we had to take a ferry from a town called Anacortes. On the way back home the holiday lights were shining and I was excited to have something to photograph for this week's prompt at the Good to Wow Challenge. The prompt is Holiday - Christmas and believe it or not I have not decorated the house yet. My family tends to wait for a time when we can all be together to do it (one of our traditions), which often comes later in the month of December than I would like. So right now for me the holidays are about watching the lights go up around town and enjoying them that way :o). Below are my two SOOC shots, one of a store front of a cute little shop called "A Little Bit of Everything" and the other of beautiful stained glass in a church window. For the store front I went with a high aperture number to get some starbursts on the lights and for the church shot a slow shutter speed to showcase the softness of the stained glass. I love that these two shots represent different facets of the holiday and seem to call out Merry Christmas!

Settings: ISO 200, 30mm, ss2.0sec, f/14 (full manual, tripod, tungsten wb)

Settings: ISO 200, 32mm, ss1.3sec, f/6.3 (full manual, tripod)
"Perhaps the best Yuletide decoration is being wreathed in smiles." - Author Unknown


Linking up with Good to Wow! Head over and check out the other SOOC shots.

Tuesday, October 18, 2011

Tones on Tuesday #5 10.18.11

Welcome back to Tones on Tuesday! I have to mention how wonderful it was to see so many new faces linking up last week. Wonderful and yet it made picking a few to showcase so much tougher! I wouldn't have it any other way though :o).

Here my three showcases from last week. I have made a button for those who have been showcased so be sure to grab it!

Jeanne from Butterfly Tales
What I love about this picture is that it is not a simple black and white, it has a bit of color. I love how the texture and the tones work together to convey a vintage mood. Thank you for linking up Jeanne!

Ashley Sisk from Ramblings and Photos
IMG_8181 blog
Ashley has been sharing some amazing history from her Europe trip. These photos are from the Catacombs in Paris and the tones communicate a moody vibe that works so well with these images. I also love the soft feel of all of her black and white photos. Thank you for linking up Ashley!

Rachel from Crinkle Photography
The perspective of this shot is so interesting and I think the black and white seems to freeze this moment in time. Thank you for linking up Rachel!

Be sure to grab your button if you were showcased! (button for linking up can be found after the guidelines)


Now it's your turn to share your photo with altered tones. Here is the guidelines for Tones on Tuesday:

  • The basic idea is to share one photo where you have altered the tones. Such as a black and white photo or a sepia toned photo. Feel free to share the original and edit, or just the edit.
  • Please share a photo that you have taken and edited yourself.
  • If you have more than one photo in your post please indicate which one if for Tones on Tuesday.
  • Please link up with your permalink and not your blog address.
  • Attach the Tones on Tuesday button to your post
  • Leave comments for the other participants, share the love :o)!
  • Have fun!

Disclaimer - By participating you give Scattered Horizons permission to share your photo on this blog. Photographers will be given credit for their work.

For my photo this week I wanted to try something I had in mind when I envisioned this link up and that is coloring the tones of a photo. In this case I used two photo filters in Photoshop - one brown and one orange to get the effect I wanted. As I was editing I was having trouble getting the result I wanted, until I realized I wasn't sure what I wanted. This leads me to my photo tip for Photo Tip Tuesday. My tip is to have an intention, an intention for capturing the photo with your camera and an intention for editing. This is not always necessary and "accidents" or the unplanned can be beautiful. However, I find that when I have an intention for what I want to communicate I am able to focus and bring about the best possible shot. 

For this photo, my intention when shooting was to capture the Seattle Skyline framed through the structures at Gasworks Park and to capture the starbursts of light. Therefore I used a high aperture number to get the starbursts and set up my tripod to get some of the structure on each side. In editing, my intention was to remove some of the gray in the photo and replace it with warmer tones to showcase the light. Thus the orange and brown photo filters. I would love to know your thoughts and if you find having an intention helps or hinders you. Thank you for stopping by!

SOOC - except for the removal of a streak from a plane due to slow shutter speed
Settings: ISO 800, 24 mm, ss13.0secs, f/23 (full manual on tripod)

Edited in Photoshop with Orange and Brown Photo Filters
"It is one of life's bitterest truths that bedtime so often arrives just when things are really getting interesting." - Lemony Snicket

Linking up with Jaymi's Photo Tip Tuesday. I learned so much last week and I can't wait to learn more! Also linking up with Capturing Beauty and The Creative Exchange. Be sure to check out the other beautiful shots. 


Live, Love, TRAVEL